Классическая версия творческой студии ютуб
Содержание:
- What is YouTube Studio
- 4. Edit Videos
- Как установить Творческую студию YouTube на свой ПК
- Суть приложения в двух словах
- Uploading video
- Обзор творческой студии на Ютуб, что там есть
- Установка на мобильном устройстве
- You Can Do More With YouTube Studio
- Setting monetisation
- 2. View Real-Time Channel Analytics
- How to Install YouTube Studio in PC (Windows and Mac OS)
- Способы возврата на ПК
- Как пользоваться Творческой студией на Ютубе
- Setting endscreen
- 1. Manage Multiple YouTube Channels
What is YouTube Studio
YouTube offers the tool YouTube Studio for content creators to manage their channels more effectively.
Before, this tool was called Creator Studio. Still, the goal was the same as today: make it easier for creators to manage their channel through a control dashboard. A ‘must’ for any content creator.
To access this tool, simply click on your icon, located at the top right, and tap the option ‘YouTube Studio’.
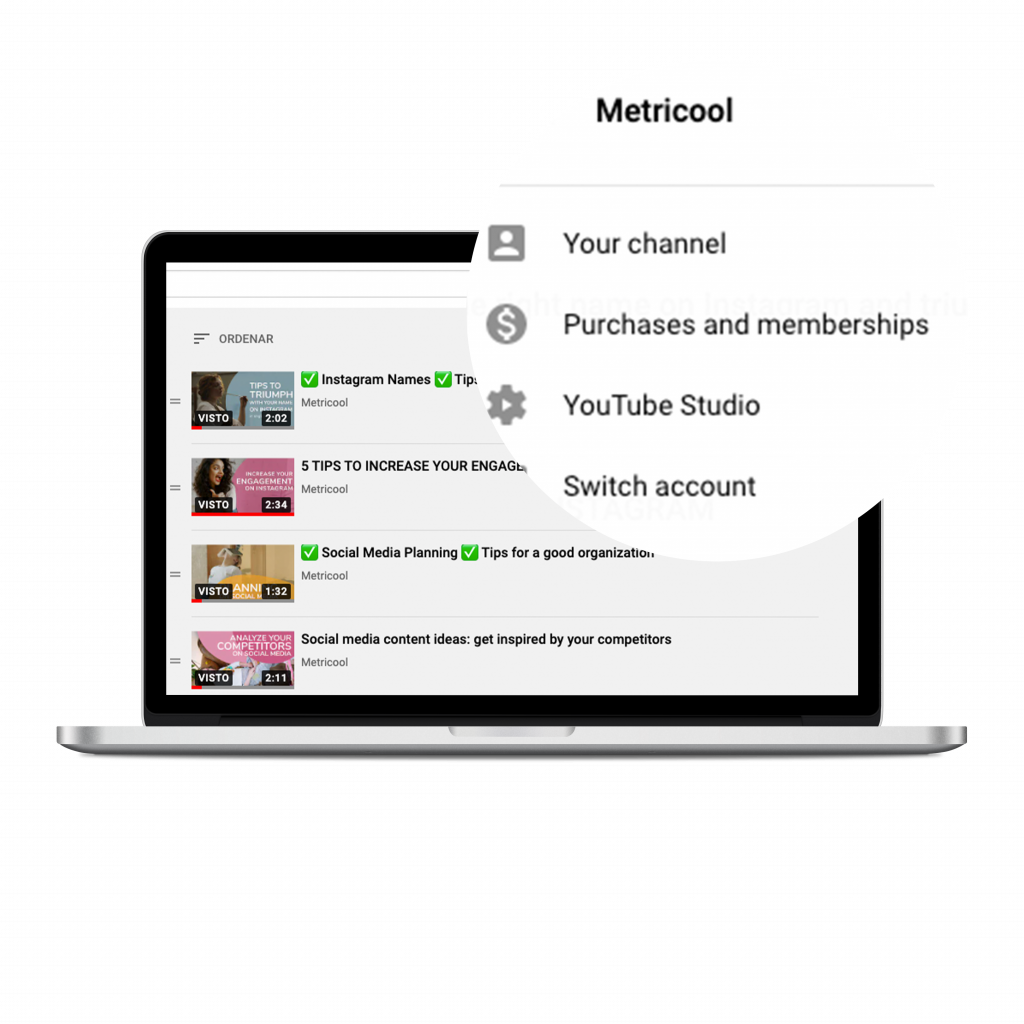
Are you already inside? Let’s see all the options you have for your channel.
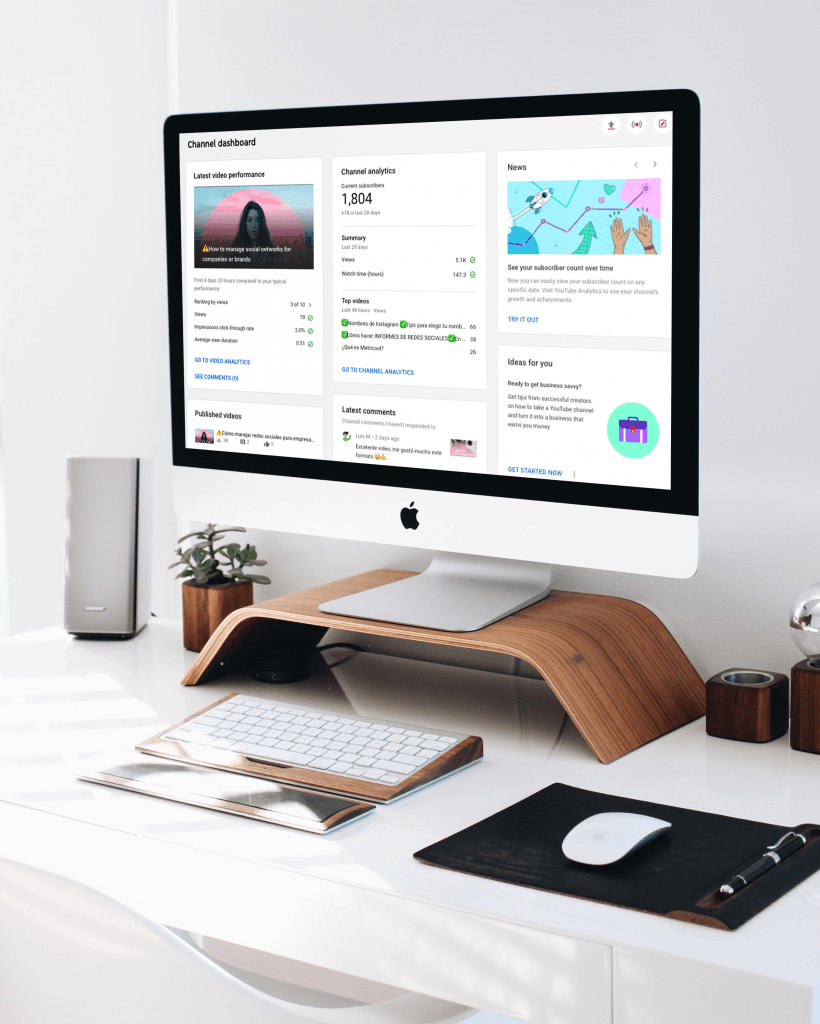
How YouTube Studio works
Once you click on YouTube Studio, you will be taken to the channel dashboard by default. You can analyze the channel analytics, upload videos or live broadcasts, and see what’s new in Studio.
Is this all there is? Not at all. YouTube Studio is much more than a control dashboard. You will see that on the left sidebar column, you can manage everything related to your channel.
What will you find here?
️Content
In this section, you will find a quick and brief summary of all the videos you have uploaded, as well as the live broadcasts you have made.
You will have information about the visibility, restrictions, views, or interactions of the video.
️Playlists
Here you can manage the playlists you have created, create a new playlist from scratch and edit them.
You can add your own videos or from other channels to create playlists.
️Analytics
A comprehensive analysis of your channel based on the data provided by YouTube: overview, reach, engagement, and audience. Also, you can check data in real-time.
A great way to get to know your audience and see how they behave.
Comments are essential as a way to interact with your viewers as they allow them to share their opinions on the videos you upload.
From this section, you can manage, read and reply to all the comments.
️Subtitles
Subtitles will help you reach a larger audience with the content of your videos. You can add subtitles manually. Also, you can manage them for videos that have been already published and in drafts.
️Copyright
You can claim the ownership of a video that belongs to your or your company from the platform.
You will have the requests you have made handy, and you can also have access to a button to request a new video removal.
️Monetization
Do you want to monetize your channel? Here you will manage everything related to the members of your channel and the merchandising settings.
️Customization
Customize your channel so that your community identifies the channel as yours. Share a trailer for people who haven’t subscribed yet, choose a featured video for returning subscribers, or add a new section.
You can also add your channel’s logo and banner, as well as basic information.
️Audio Library
A complete list of royalty-free music and sound effects to use in your videos. You can also highlight the ones that interest you to find it easily in the Featured Music section.
YouTube Studio offers you the formula to have your entire YouTube channel under control.
4. Edit Videos
If you can’t afford the cost of dedicated offline video editors, YouTube Studio now has an editor that lets you perform online video editing.
The best way to access the video editor is to list your video as a private video by ticking the Private option in the visibility step. That’s a better way, as you don’t want to perform raw edits on a video that’s already public.
When you go back to the listed videos, you can then click on the recently uploaded video. And click on the Editor option at the left-hand corner of your screen to edit your video.
Take Advantage of the Editor
While not offering many advanced features like dedicated apps, the YouTube Studio video editor lets you do basic editing that at least gets your video ready for publishing.
You get to cut and merge fragments of your videos, add an end screen, video elements, and copyright-free audio from YouTube. And just recently, the blur effect has been added to the editor—this gives you more control over the objects that appear to viewers.
Как установить Творческую студию YouTube на свой ПК
Приложение студии существует лишь в мобильном формате, но мы можем адаптировать его для компьютера Windows. В этом нам поможет простая и бесплатная программа LDPlayer. Это – андроид-эмулятор, который создает некое виртуальное устройство. В нем и запускаются мобильные приложение, будто на вашем ПК есть андроид-смартфон или планшет.
На практике это означает, что мы просто запустим эмулятор, войдем через него в Play market, скачаем нужное приложение и будем запускать его. Весь процесс происходит ровно так же, как на смартфоне. Опишем всю процедуру более подробно.
проведите
- войдите в Play Market – вы найдете иконку магазина в папке Приложения системы на главной страничке программы;
- авторизуйтесь при помощи Google-аккаунта, используя тот, что у вас уже есть, или создавая новый при первом входе;
- после этого вы получите возможность использовать функции магазина;
- наберите в строке поиска название приложения и нажмите на Enter;
- вы перейдете на страницу студии YouTube – останется лишь кликнуть по кнопке установки.
Ярлык приложения появится на домашней странице эмулятора, и вы сможете запускать его оттуда кликом мыши в любой момент. Вся процедура займет буквально пару минут. Если у вас возникнут проблемы, вы можете найти ответ на сайте – в разделе помощь или Ответы на вопросы. Также можно оставить комментарий с описанием своей проблемы под этой статьей.
Суть приложения в двух словах
Творческая студия YouTube изначально создана для проведения корректировок уже готовых видеороликов с помощью дополнительных средств сервиса. Не секрет, что платформа предлагает пользователям добавлять описания к видео, накладывать дополнительные окна со ссылками на другие ролики, добавлять субтитры и совершать прочие действия. Однако, в случае с приложением речь идет о несколько других вещах.
В нем вам доступно лишь несколько функций:
- изучение аналитических и статических отчетов;
- работа с комментариями: модерация и общение;
- получение уведомлений о важных событиях на канале;
- установка и изменение времени публикации роликов;
- работа с настройками монетизации;
- изменение значков оформления;
- управление плейлистами.
Таким образом, Творческая студия YouTube послужит лишь дополнительным инструментом для организации вашей работы как видеоблогера. Основные же действия вам придется совершить на этапе съемки и монтажа в одной из удобных программ – например, YouCut.
Ну а при помощи приложения студии вы всегда сможете проанализировать, какая аудитория чаще смотрит ваши видео: мужская, женская, возрастная или не очень, из каких люди стран и так далее. Это позволит вам лучше понимать настроения пользователей и начать более правильно позиционировать свой канал – без этого далеко в продвижении уйти не получится.
Не менее важной функцией является работа с комментариями. Сами по себе комментарии являются важным аспектом при продвижении – чем их больше, тем лучше
Но негативный фон может отпугнуть пользователей. Поэтому важно следить, чтобы беседа продвигалась в правильном русле. Также, когда автор канала принимает участие в обсуждении под видео, это всегда идет в плюс. Людям может захотеться пообщаться с ним, а каждый комментарий помогает продвижению.
Поэтому, скачать Творческую студию YouTube на ПК стоит уже ради этого
С данным приложением вы всегда сможете удержать руку на пульсе происходящего и не пропустите ни одной важное событие своего канала
Кроме того, при помощи приложения можно распределить свои ролики по плейлистам. Эта функция очень удобна для пользователей, и благодаря настройке они будут дольше задерживаться на канале. Также есть шанс, что щрители будут смотреть плейлисты целиком, ведь видео в них переключаются автоматически. Само собой, увеличение просмотров – хороший знак для любого блоггера. Настройка плейлистов, когда у вас большое число роликов – задача сложная и долгая. Но при помощи данного приложения вы сможете выполнить ее намного проще.
Таким образом, Творческая студия поможет вам в вашем ежедневном труде по привлечению и удержанию аудитории на своем канале YouTube. Есть смысл установить приложение, если вы хотите добиться в сфере блоггинга чего-то серьезного и большого. Чем лучше оформлен канал, чем активнее его автор – тем быстрее происходит рост!
Uploading video
const fs = require('fs')
const { init, upload } = require('youtube-studio')

await init({ ... }) // read more below (Preparing Authentication)

const result = await upload({
    channelId: 'UCzQUP1qoWDoEbmsQxvdjxgQ', // your channelId
    stream: fs.createReadStream('./example=video.mp4'), // your video stream

    newTitle: 'new video 1', // optional, your video name
    newPrivacy: 'PRIVATE', // optional (PRIVATE by default), ('PUBLIC', 'UNLISTED', 'PRIVATE' options available)
    isDraft: false, // optional, video can be a draft (false by default)
})

console.log(result)
Full example with ‘progress’ feature available in
Обзор творческой студии на Ютуб, что там есть
Сначала мы рассмотрим элементы творческой студии, а затем перейдем к ее использованию:
1. Главная.
В этом разделе творческой студии есть возможность посмотреть статистику, например, количество подписчиков и просмотров, новые комментарии. Также здесь всплывают различные уведомления, когда нарушаются правила сообщества.
2. Контент.
Здесь вы сможете посмотреть информацию о ваших видео или трансляциях. Рядом с видеороликом вы заметите ограничения, дату публикации, комментарии, количество лайков. Кроме того, если выделить видео, поставив перед ним маркер, можно его удалить, либо изменить название и описание. Также есть инструмент копирования, ссылки на видео, скачивания и так далее.
3. Плейлисты.
4. Аналитика.
В аналитике можно узнать о количестве просмотров Ютуб канала время просмотра, сколько пришло подписчиков за последние 28 дней. Здесь показывают точные данные по графику.
5. Комментарии.
В этой статистике найдете комменты пользователей. При необходимости их можете удалить, если нажать на три точки справа, либо пожаловаться, заблокировать пользователя, назначить модеротором и так далее.
Кроме основных возможностей творческой студии, есть субтитры, анализ авторских прав, монетизация, фонотека, здесь можно скачать музыку с Ютуба, настройка канала и и другие возможности. Все здесь не перечислить.
Установка на мобильном устройстве
Напомним, что новая модификация больше подходит для просмотров видео через смартфон, но среди пользователей еще встречаются приверженцы прежнего варианта ютубовского дизайна.
Предлагаем способ, как войти в старую творческую студию на Андроиде. Соответствующие приложения размещены в свободном доступе, найти их легко, но попадается огромное количество «левых» программ, создающих настоящую опасность для мобильного устройства.
Итак, как перейти в классическую студию на ютубе? Для этого:
- удаляем клиента, установленного на мобильном устройстве;
- отключаем обновления через Плэй Маркет;
- скачиваем предыдущее ютубовское оформление, работа которого будет осуществляться без обновлений.
Для сравнения разберемся, как возвращаются к прежней версии на мобильных устройствах, поддерживающих работу iOS.
Как сделать понравившийся стиль на таких смартфонах? Для этого:
- удаляем установленного клиента;
- входим в Сафари;
- нажимаем кнопку «установить» и скачиваем прежнюю версию, в появившемся окне подтверждаем свои намерения;
- вводим Apple ID, ссылку в соответствующее поле, пользуемся старой творческой студией ютуб.
You Can Do More With YouTube Studio
YouTube Studio now has a lot of features that give you more flexibility while posting videos. And beyond the ones listed here, there are many other ones you’ll come across too.
To really get a handle on everything YouTube Studio offers is, the best thing to do is take a look around yourself. Hopefully, this article has given you a good starting point.
How to Build a Low-Cost YouTube Studio: 7 Things You’ll Need
You’ve been making some YouTube videos, and they’re gaining popularity. Now you want to make a step to the next level and build a dedicated YouTube studio.
Read Next
About The Author
Idowu Omisola
(113 Articles Published)
Idowu is passionate about anything smart tech and productivity. In his free time, he plays around with coding and switches to the chessboard when he’s bored, but he also loves breaking away from routine once in a while. His passion for showing people the way around modern tech motivates him to write more.
More
From Idowu Omisola
Setting monetisation
const { init, setMonetisation } = require('youtube-studio')

await init({ ... }) // read more below (Preparing Authentication)

const result = await setMonetisation({
    encryptedVideoId: 'hHbWF1Bvgf4', // your video ID
    monetizationSettings: {
        newMonetizeWithAds: true // Monetisation: On
    },
    adFormats: { // Type of ads
        newHasOverlayAds: 'ENABLED', // Overlay ads
        newHasProductListingAds: 'ENABLED', // Sponsored cards
        newHasSkippableVideoAds: 'DISABLED', // Skippable video ads
        newHasNonSkippableVideoAds: 'ENABLED', // Non-skippable video ads

    },
    adBreaks: { // Location of video ads
        newHasPrerolls: 'DISABLED' // Before video
        newHasMidrollAds: 'DISABLED', // During video
        newHasManualMidrolls: 'DISABLED', // Manual placement (not yet provided)
        newHasPostrolls: 'ENABLED', // After video

    },
})

console.log(result)
2. View Real-Time Channel Analytics
Of course, monitoring the overall performance of your channel is very important. To access the analytics tool, click the Go To Channel Analytics option at the bottom-right corner of the Studio dashboard. As an alternative, you can also click the Analytics option at the left-hand corner of the web app.
Once on the analytics page, you get to monitor the performance of individual videos and see the overall changes occurring on your channel. These include in-depth information on changes in the number of subscribers, number of views, and watch time.
However, beyond that overview, you also have options that let you monitor your reach, engagement, and audience type. And just like any business, these options let you make future decisions about which video types to focus on.
These other options are equally useful if you like to know more about specific performance metrics.
You can also click on the View More or the Advanced option to get a better hold on more story-telling analytics. That option is useful if you want to compare performance based on year or how one video performs compared to another.
YouTube lets you access that option when you click on the Compare To option at the top right-hand corner of the Advanced Options page.
How to Install YouTube Studio in PC (Windows and Mac OS)
Following are the 2 methods to install YouTube Studio in PC:
- Install YouTube Studio in PC using BlueStacks App Player
- Install YouTube Studio in PC using Nox App Player
1. Install YouTube Studio in PC using BlueStacks
BlueStacks is an Android App Player that allows you to run Android apps on PC. Following are the steps on how to install any app on PC with Bluestacks:
- To begin, install BlueStacks in PC
- After Bluestacks installation, double-click its icon from desktop to launch it
- Once BlueStacks is launched, you need to log in to Google account from within Bluestacks
- Click «My Apps» button in the emulator
- Search for: YouTube Studio
- You will see search result for YouTube Studio app just install it, find here the app whose developer is listed as Google LLC
2. Install YouTube Studio in PC with Nox Player
Nox Player is one such Android emulator of reputable stature. Below is a step by step tutorial on using Nox Player for installing YouTube Studio in your PC. Follow the steps below:
- See this tutorial to install Nox Player in PC
- It is Android emulator, after installing run Nox Player in PC, and login to Google account
- Tab searcher and search for: YouTube Studio
- Install YouTube Studio on your Nox Player
- Once installation is completed, you will be able to run YouTube Studio on your PC
About YouTube Studio
No talent goes unrecognized now. In every direction you find a platform to showcase your talent. You sing good, you dance, you mimic, you speak for others or whatever you do you can show it to the world. There are a lot of people out in the World who with help of themselves rose to heights of fame and success. What’s better? You can earn for what you are good at. If you are good at something, never do it for free. One such platform is youtube which allows you to upload videos and you can earn through it. You can build your huge fan base and connect to your fans.
YouTube Creator Studio is a tool for creators. Here you can upload videos and then manage your channel, feedback and connections through Studio. If you have YouTube channel you must have this Studio. With the help of YouTube Studio you can manage your channel very easily. It shows you stats and provides you recommendations for how you should manage your account.
Unique viewers show the number of people who watched your video and compare it with number of views on your previous posts. This comparison lets you see what of your content got most viewed which helps in strategizing your content in such a way to gain wider audience.
There is a news section that lets you see what is happening in the world so you stay updated about that is new in the market and what kind of content you should make. It also provides you personalized recommendations which align exactly with specified needs of your channel. Creator Studio is the faster way to manage your channel. It keeps you connected and lets you check stats, schedule videos and respond yo comments. This way, wherever you are you are in touch with your fans.
As compared to any other app or site you use, it provides better security. It keeps your personal data private and you can easily customize your audience for sensitive information like stats and analytics etc.
As this app is dedicated for you to manage your channel so it notifies you whenever something important happens. It helps you manage your playlists and keeps you updated about monetization settings and scheduled videos. Its all-in-one app to manage your channel.
YouTube Creator Studio APK and Features:
- Easily respond to comments
- Manage channel and monetization settings
- Notifies when something important happens
- Schedules videos and monitor channel
- Manage playlists
Download the app and let it make your life easy by taking control of your channel and manage it in the best possible way. Leave your monitoring and calculations to it and let it do your work for you.
Other Apps by Same Developer:
- YouTube APK Download
- Google Apps Device Policy APK Download
- Google Play Games APK Download
- Google Play Music APK Download
Способы возврата на ПК
Рассмотрим, как зайти в классическую студию ютуб, используя меню пользователя. Для этого:
- переходим в аккаунт, жмем на картинку в профиле;
- открываем пользовательское меню, находим пункт «творческая студия»;
- в открывшемся списке выбираем подпункт «классическая версия».
Обращаем внимание, что такой способ открытия классической творческой студит YouTube не всегда дает положительный результат. Случается, что обновленная версия возвращается автоматически после определенного количества переходов по видеороликам
Во избежание этого пользователю приходится вносить доработки в расширения
Случается, что обновленная версия возвращается автоматически после определенного количества переходов по видеороликам. Во избежание этого пользователю приходится вносить доработки в расширения.
Теперь разберем еще один вариант, как вернуть в ютубе классическую версию студии. Чтобы выполнить это, пользуются специальным браузерным дополнением, которое скачивается и устанавливается на компьютер. Чаще всего выбор останавливают на Tampermonkey либо Greasmonkey, которые работают вместе со скриптом Old Design, вписывающимся в установленное расширение самостоятельно.
В результате возвращается старая творческая студия в ютубе для ПК.
Как пользоваться Творческой студией на Ютубе
Для этого не нужно быть специалистом. Давайте разберем один из примеров использования данного инструмента. Допустим, мы загрузили видеоролик на канал и ошиблись с его названием. Чтобы его изменить, достаточно открыть в творческой студии «Контент», далее кликните слева перед видео, и установится маркер. После этого справа от видеоролика нажимаете на три точки и выбираете из меню «Изменить название и описание».
Далее вы увидите поле, в котором можно отредактировать ваш текст. Когда он будет изменен, нажмите «Сохранить».
Мы рассмотрели только один пример, который доказывает, что работать с творческой студией вам не составит труда.
Setting endscreen
const { init, setEndScreen, endScreen } = require('youtube-studio')

await init({ ... }) // read more below (Preparing Authentication)

const videoLengthSec = 1404
const TWENTY_SEC_BEFORE_END_MS = (videoLengthSec - 20) * 1000

const result = await setEndScreen(VIDEO_ID, TWENTY_SEC_BEFORE_END_MS,
    { ...endScreen.TYPE_RECENT_UPLOAD }, // recent upload in top left position
    { ...endScreen.POSITION_BOTTOM_RIGHT, ...endScreen.TYPE_SUBSCRIBE(CHANNEL_ID) }, // subscribe button
    { ...endScreen.POSITION_TOP_RIGHT,    ...endScreen.TYPE_BEST_FOR_VIEWERS,      ...endScreen.DELAY(500) }, // best for viewers delayed with 0.5 sec
    { ...endScreen.POSITION_BOTTOM_LEFT,  ...endScreen.TYPE_PLAYLIST(PLAYLIST_ID), ...endScreen.DELAY(1000) } // playlist delayed with 1 sec
)

console.log(result)
1. Manage Multiple YouTube Channels
Since YouTube Studio is specific for individual channels, it allows you to manage multiple YouTube channels at a time. All you need to do is to switch channels. And if your YouTube channels are in different Google accounts, you can always swap your Google accounts as well.
You can switch your account either before or after launching the Studio. Once you log in to your YouTube account, just like you did while locating the YouTube Studio, click on the picture menu on your account and click Switch account to select your preferred YouTube channel. The process is pretty much the same while in the YouTube Studio.
That way, you get to monitor each account differently and more conveniently.
Create a Brand Channel
However, you can also create more than one YouTube channel with a single Google account. That new account is called a brand channel.
To create a brand channel, go to Settings, then go to Channel and navigate to the Advanced settings option. Then click on Manage YouTube account. This will take you to a new page where you get the option to Add or manage your channels.