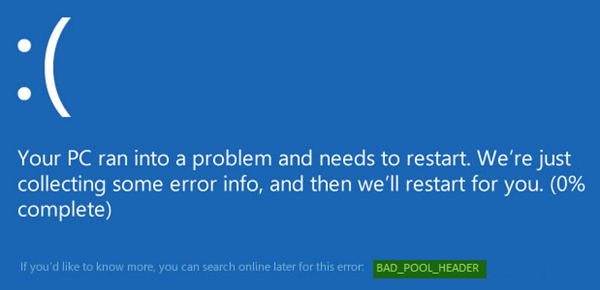
Исправлено: ошибка bad_pool_caller в windows 10/8/7
Содержание:
- Part 3. How to fix the Bad Pool Header error in Windows 10/8/7
- Method 1. Update Device Drivers
- Method 2. Disconnect and unplug external devices
- Method 3. Check your RAM(Random Access Memory)
- Method 4. Disable Windows indexing service and Windows search
- Method 5. Uninstall anti-malware software temporarily
- Method 6. Disable fast startup in Windows 10
- Method 7. Perform Clean Boot in Windows 10/8/7
- Способ 3: проверка драйверов
- Методы устранения неполадки
- Available Options to Fix Bad Pool Header Blue Screen Error in Windows 10
- Fixing “0x00000019” on Windows
- Bad Pool Header error solution If the blue screen
- Resolution
- BAD POOL HEADER error in Windows 10
- Solution 2: Disabling Fast Startup
Part 3. How to fix the Bad Pool Header error in Windows 10/8/7
There are some solutions to solve the issue and you would find the one to fix the Bad Pood Header for you Windows computer. Sometimes, the issue is not serious and you can restart your computer to let it recover and repair automatically. But still if the problem exists, you should follow the methods mentioned below to repair Bad_Pool_Header BSOD error.
Method 1. Update Device Drivers
Generally speaking, old or faulty drivers create this Windows Bad_Pool_Header error so you need to check all your system drivers and then update all old drivers. At first, you should download and install the Driver Update program of your choice and then scan all your drivers. This action will detect any potential problems with your drivers. You can uninstall old drivers and then download the latest version to install. You also identify the error or faulty drivers from Control Panel and drivers install folder in local disk.
Method 2. Disconnect and unplug external devices
Sometimes the hardware devices we connect to our system except the keyboard and mouse are responsible for this problem. If you would like to check whether an external device could be causing this error, then remove all the devices like any USB hubs, flash drives, external hard drives, webcams, etc. and restart your Windows computer. If this solves your problem, then you will get to know that this BSOD error is because of some external devices.
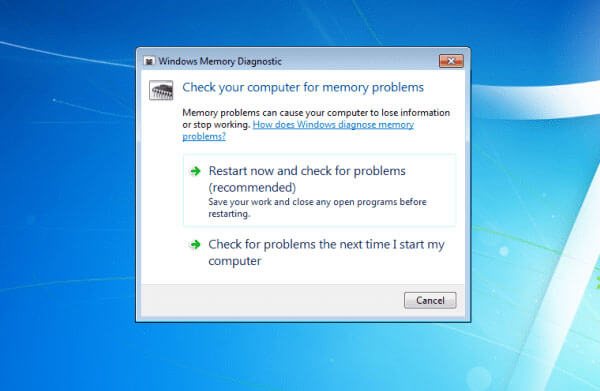
Method 3. Check your RAM(Random Access Memory)
Sometimes corrupted or faulty RAM creates the blue screen error. Run the Windows Memory Diagnostics Tool to test and diagnose your RAM. Often, this Bad Pool Header of Blue screen error is caused by a dusty RAM, so you can take it out and clean the RAM carefully by unplugging from motherboard and then get it back in. If your RAM is damaged or infected then you need to change the RAM.
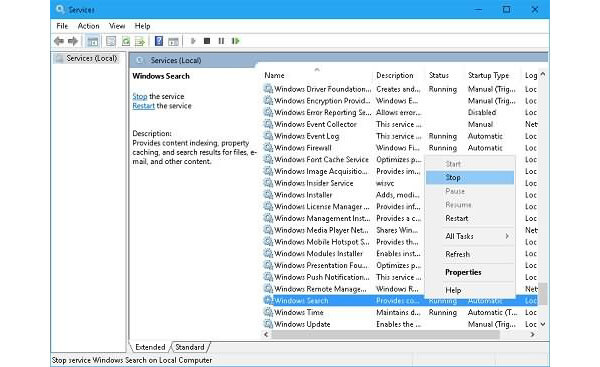
Method 4. Disable Windows indexing service and Windows search
If the Bad Pool Header error still exists, you can disable Windows indexing service and Windows search. For this, you will require administer access of your Windows PC and follow the below steps. Firstly, go to «RUN», press Windows logo along with «R» and then type services.msc followed by enter. Find the Indexing service or Windows Search and double click on it. Now change the startup type to Disabled or Manual from «Automatic».
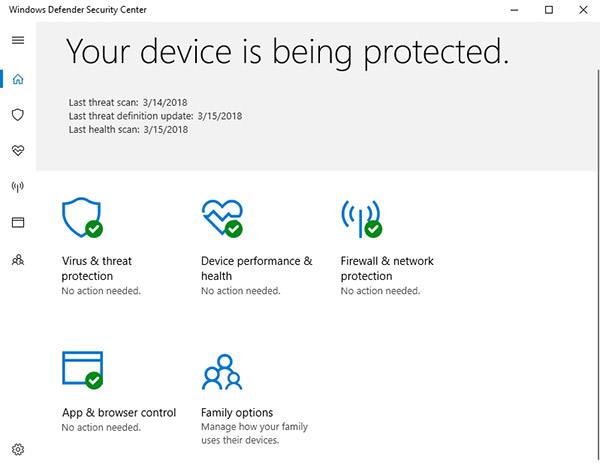
Method 5. Uninstall anti-malware software temporarily
The Bad_Pool_Header BSOD error in Windows 10 is very often linked to antivirus applications. It is amazing that many different software errors are caused by antivirus applications interfering. When antivirus program detects any virus, it lets you remove or fix the virus that’s time may delete system file with the virus and encounter the error. Thus we would strongly recommend you to disable your antivirus program to check whether it is causing the error. Once you have disabled your antivirus program, you should check whether the problem has gone away.
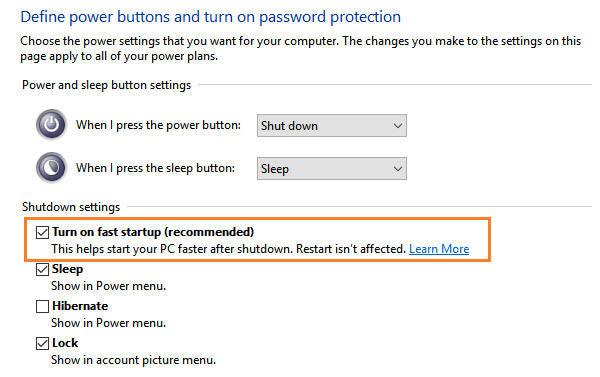
Method 6. Disable fast startup in Windows 10
Sometimes Windows 10 shows this error for upgrading the operating system from old OS. At times, it can interfere with the system and cause Bad Pool Header corruption. To do this method, you need to log into Windows on the problem computer. If you can’t, restart it in Safe Mode to try. At first, press the «Windows logo key» and «R» at the same time, then click «Power Options». Look at the different options on the left-hand side and click on the following one: «Choose what the power button does». Once your «System Settings» display on your screen, then click on «Change settings that are currently unavailable». Uncheck «Turn on fast startup (recommended)», then click «Save changes». At last, reboot your Windows computer and see if the error is fixed.
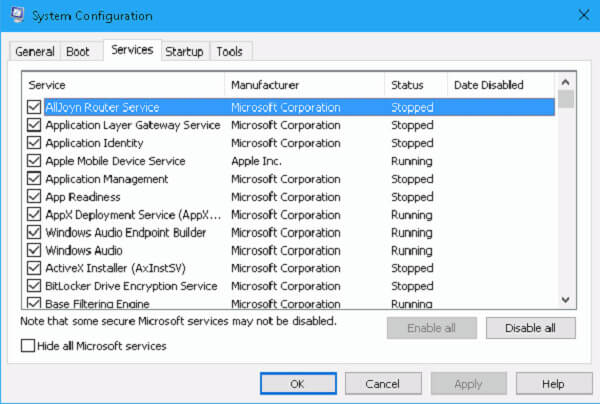
Method 7. Perform Clean Boot in Windows 10/8/7
If your computer encounters the Bad Pool Header error, you could consider performing a «clean boot.» To perform clean-boot troubleshooting, you must take a number of actions, and then restart the computer after each action. To enter a clean boot state, type «msconfig» in start search and hit «Enter» to open the System Configuration Utility. Click the «General» tab, and then click Selective Startup. Clear the «Load Startup Items» check box, and ensure that «Load System Services» and «Use Original boot configuration» are checked. Reboot your computer and see if the Bad Pool Header error comes up again.
Способ 3: проверка драйверов
Чаще всего к возникновению ошибки Bad Pool Header причастны драйверы устройств.
Если недавно переустанавливали или обновляли WIndows, то проверьте их в первую очередь. Во время переустановки или обновления WIndows автоматически устанавливает стандартные поверх оригинальных драйверов производителей. Обновленные версии, загруженные из Центра обновления Windows могут не подходить, вследствие неправильная работа и распознавание устройств приводит к ошибке Bad Pool Header.
Конечно, выявление «неправильного» драйвера может оказаться долгой процедурой. Нужно обновить все устройства. Но можно сузить поиск. Например, если синий экран BSOD возникает всякий раз при подключении к интернету, то сначала проверяем в Диспетчере устройств Wi-Fi адаптер и сетевую карту (Ethernet).
Приведем пример обновления сетевого адаптера. Эти шаги нужно повторить для обновления всех устройств, которые, по вашему видению, могут быть причиной проблемы:
- Нажмите одновременно Win+R.
- Наберите devmgmt.msc и подтвердите выполнение.
- Разверните раздел Сетевые адаптеры.
- Проверьте, есть ли желтый треугольник с восклицательным знаком, который указывает на ошибки с драйверами. Если присутствует красный значок, то у Windows возникли проблемы с установкой соединения с этим оборудованием.
Если видите желтый предупреждающий знак, выполните следующие действия:
- Щелкните правой кнопкой мыши на адаптер и выберите «Обновить драйвер».
- Выберите автоматический поиск обновленных драйверов.
После загрузки последней версии выполните следующие действия:
- В Диспетчере задач разверните Сетевые адаптеры.
- Щелкните правой кнопкой мыши на сетевую карту и выберите Свойства.
- Перейдите на вкладку Драйвер.
- Посмотрите на версию драйвера и проверьте, совпадает ли она с последней версией, загруженной из сайта производителя. Если это не так, закройте это окно.
- Снова щелкните правой кнопкой мыши на устройстве и выберите «Обновить…».
- Выполните поиск драйверов на этом компьютере.
- Кликните на «Обзор» и перейдите к папке, в которую скачали последнюю версию.
- Нажмите «Далее» и следуйте инструкциям на экране.
Если проблема все еще не решена, нужно удалить устройство и пусть Windows установит стандартный набор сетевых драйверов. Это может решить проблему, так как Windows установит наиболее совместимые.
Для этого, кликните на сетевой карте правой кнопкой мыши, выберите «Удалить», сохраните изменения и перепустите компьютер. Система автоматически установит новый универсальный драйвер для этого устройства.
https://youtube.com/watch?v=4mlv8uejlFs
Методы устранения неполадки
Рассмотрим детально, с поочерёдным описанием методов, как исправить неполадку с кодом 0Х00000019 на примере Windows 7. Специфика выполнения задачи для последующих версий будет аналогична, с незначительными отличиями. К примеру, будет отличаться по выполнению запуск системы в «Безопасном режиме»: на семёрке для этого достаточно во время запуска ПК активировать директиву F8, а в случае с восьмёркой и десяткой необходимо будет воспользоваться установочным диском или флешкой, с записанным на него дистрибутивом Windows 10 или 8. Работы рекомендуют выполнять в указанной очерёдности: начать работу с исключения наиболее вероятных причин сбоя, с последующим переходом к следующему этапу, если предыдущий метод не дал положительного результата.
Так как обсуждаемая ошибка чаще всего ассоциируется с памятью ПК, с её несоответствием по параметрам объёмам приложений, эксплуатируемых на устройстве, восстановительный процесс стоит начинать именно с диагностики оперативки. С этой целью рекомендуется воспользоваться возможностями стороннего софта, например, применить программу MemTest86, которая позволяет выявить дефектные планки. Если на ПК установлена не одна планка памяти, диагностировать рекомендуется их поочерёдно, что позволит выявить проблемный модуль. А также проблема может заключаться не в технической неисправности планок или выходе из строя, а в банальном их засорении, или же в ненадёжных контактах. Для исключения такого варианта событий рекомендуется тщательно прочистить все контакты планок, а также проверить надёжность и плотность подключения всех шлейфов устройства.
Если с памятью всё в норме, тогда стоит переходить к исключению варианта с драйверами. Для решения проблемы проведите обновление абсолютно всех драйверов на ПК до последних версий. Так как в ручном режиме выполнить эту задачу затруднительно, воспользуйтесь ресурсами одной из предложенных разработчиками утилит, например, задействуйте софт DriverPark Solution, прекрасно зарекомендовавший себя в этой сфере, или же примените другие аналога приложения. После обновления драйверов не помешает блокировать службу индексирования эксплуатируемого контента, что существенно влияет на производительность компьютера. Для этого зайдите в параметр через меню «Пуск», осуществив вход с правами администратора: в поисковой строке пропишите команду services.msc, откройте пункт Windows Search, и задайте в строке «Тип запуска» характеристику «Отключена», подтвердив команду клавишей «ОК», с последующим перезапуском ПК для вступления в силу изменений.
Если и эти процедуры не привели к положительному результату, стоит исключить вариант с наличием вредоносных компонентов в системе. С этой целью потребуется сканирование ПК на вирусы любым из надёжных, имеющихся в распоряжении программ. Если версия с заражением ПК не подтвердилась, попробуйте временно удалить антивирусную программу, установленную на вашем ПК: именно её некорректная деятельность может выступать провокатором ошибки BAD POOL HEADER.
Винчестер, даже при отсутствии механических повреждений на нём, нередко является первопричиной появления «синего экрана», если его контроллеры часто подвергались некорректным манипуляциям, в виде неправильного завершения работы Windows, некорректной или неполной установки программ, перебоев в подаче электроэнергии или скачков напряжения и тому подобное. Проверить, и при необходимости исправить системные проблемы с жёстким диском можно задействовав ресурсы Windows: в командной строке потребуется ввести команду chkdsk/f/c, активировать сканирование клавишей Y, перезапустить ПК и подождать, пока процесс будет завершён.
Ещё одним эффективным методом борьбы с ошибкой является «откат» системы до момента, когда ПК работал исправно. Этот вариант подразумевает использование точки «возврата» через инструмент «Восстановление системы», где потребуется выбрать момент, до которого необходимо осуществить «реверс» операций, осуществляемых на ПК. Дальше, следуя вспомогательным подсказкам «Мастера восстановления», останется только довести процесс до логического завершения. Единственным препятствием для выполнения этой процедуры может выступать отсутствие точки возврата, если пользователем была ранее отключена функция автоматического архивирования образа ОС. Как крайняя и радикальная мера борьбы с ошибкой BSoD пользователями позиционируется чистая инсталляция Windows.
Available Options to Fix Bad Pool Header Blue Screen Error in Windows 10
- Disconnect All Attached Devices
- Uninstalled Recently Installed Drivers or Software
- Boot to Safe Mode, then Perform Clean Boot
- If Everything Else Fails try DISM and SFC Commands
Here are the details for each Fix
Disconnect All Attached Devices
Some users have reported that when they connect a Modem to their computer they experience bad pool header blue screen error.
So the first step to fix bad pool header error is to disconnect all external devices connected to your computer.
Follow the steps below to try this fix:
- Disconnect mouse, keyboard, modem and any external device connected to your computer. Then boot the computer.
- If the computer boots without errors, connect the devices one at a time and boot the computer. I suggest you start by connecting your mouse. Then keyboard (for desktops)
- When you discover the device that is causing the error, you may disconnect it permanently or try restarting the device. You could also try changing the cable connecting the device to your computer
If this fix does not resolve bad pool header error, try the next fix.
Uninstalled Recently Installed Drivers or Software

I mentioned in the introduction of this guide that bad pool header error is most likely caused by a device driver.
So, my next recommended fix is to uninstall any device driver or software you installed recently. To apply this fix, use the steps in (opens in a new browse).
Boot to Safe Mode, then Perform Clean Boot

Here are the steps for this fix:
Use the steps in this guide to boot Windows 10 to safe mode – Start Windows 10 safe Mode by Interrupting Normal Boot (opens in a new browser tab).
If you are able to boot to safe mode without the bad pool header blue screen error, then you may be able to determine the service or startup program causing the error.
To do this use the steps in How to Enable Clean Boot in Windows 10 to determine programs that may have caused the memory issue and fix it.
If Everything Else Fails try DISM and SFC Commands

If the 3 suggested fixes in this guide does not fix bad pool header blue screen error, try this:
- Open this guide How to Fix DISM Error 50 in Windows 10 and Windows Server 2016.
- Follow the steps to run the DISM and SFC command as described.
Though the guide referred to above is specific to fixing DISM error 50. The steps are still applicable to fixing bad pool header blue screen errors.
DISM and SFC command are known to fix most Windows error incuding Blue Screen of Death (BSoD) errors.
Fixing “0x00000019” on Windows
Fix #1: Test your RAM
If the error is caused by a faulty RAM memory, check your RAM using the Windows Memory Diagnostic Tool.
To do so, follow these steps:
- Click Start
- Type in Memory Diagnostics Tool in the search box
- Right-click on Memory Diagnostics Tool
- Choose Run as Administrator
- Follow the instructions to begin the diagnostic process

Windows memory diagnostics screen
If Windows Memory Diagnostic isn’t returning any results, you can also use Easy Recovery Essentials’ Automated Repair feature that can check your RAM, HDD and CPU in a single process:
- Download Easy Recovery Essentials
- Burn the ISO Image. Follow our instructions on how to burn a bootable ISO image. If you’d like to have a recovery USB instead, follow our instructions on how to make a recovery USB.
- Boot into Easy Recovery Essentials
- Select Automated Repair
- Click Continue and wait for the Automated Repair process to finish. Automated Repair process will report any issues found with your hard disk or RAM memory:
To download Easy Recovery Essentials, click here.
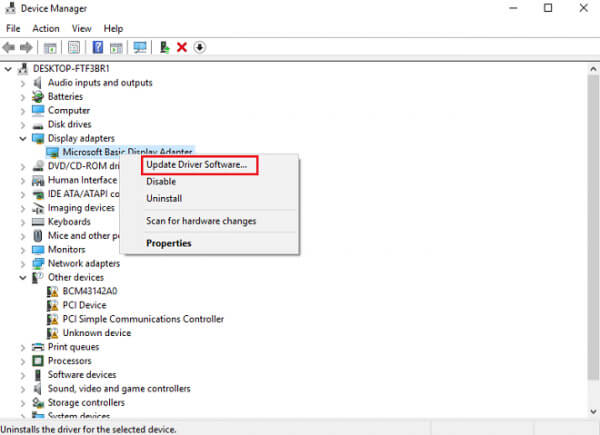
Fix #2: Update drivers
To check if the error is caused by a faulty drive, run an automatic driver update or manually update the drivers to the latest available versions.
To manually update a driver, follow these steps:
- Click Start
- Type in devmgmt.msc in the search box
- Click devmgmt from results list
- Right-click on the driver
- To update the driver, select Update Driver Software.
- To disable the driver, select Disable.
- To uninstall the driver, select Uninstall.
Device Manager screen
To run an automatic driver update, follow these steps:
- Click Start
- Go to Devices and Printers
- Right-click on your computer
- Select Device Installation Settings
- Select Yes, do this automatically
- Click Save Changes
- Follow the necessary steps to continue the process

Device installation screen
Fix #3: Uninstall anti-malware software
Sometimes anti-malware software, like Malware Bytes, can be the main cause of this error.
Uninstall any anti-malware software running on your computer and then restart your computer.
Bad Pool Header error solution If the blue screen
When you try to go to a new ten or make it updating, sometimes the user may encounter a message «BSOD Bad Pool Header «- a nuisance that manifests itself in the form of a blue screen of death.

There are several recommendations, ready to bring a positive result of solving such a problem.
So, Bad Pool Header when installing Windows 7.8, 10 — How to fix? The first thing is that it is recommended to perform is to check the hard disk for the presence of a sufficient amount of free space on it. Naturally, it is necessary to do this with the partition where the installation is planned.
the next reason, the consequence of which is the Bad Pool Header blue screen, one of the antivirusers often becomes often. Recommended at the time of installing or updating it to turn it off. Ideally, to completely demolish from a hard disk and only after completing all the necessary procedures — return to the place.
If not one of the above methods did not help solve the task, the Bad Pool Header Windows 10 error still continues to occur, It is recommended to implement in practice the following instructions:
- make sure that all the necessary updates are installed. You can make it in the system update service menu.
- via the Start button to enable the command line.
- to force the operating system to automatically check using the «CHKDSK C: / F» order.
- Initiate the restart OS after passing the procedure described above.
- via the Start button Go to the control panel, then in the menu that is responsible for the power supply.
- in the left Screen parts Log in to Settings Changes.
- Go to the next menu that is responsible for settings, «which are currently inaccessible.»
- make sure that the check mark is not necessary in front of the option to use The function of fast running of the operating system.
- Restart the computer again.
Almost always after carrying out such a process and make changes to the parameters described above, the problem is eliminated and you can safely continue earlier. interrupted work.
Of course, there is a possibility that this met One will not give the desired result. This can usually occur when the user made an installation of any information product on the Winchester of its PC, which causes a conflict.
Naturally, uninstallation of this software should be uninstalled or roll back the system to the last operating state. Of course, if the user took care of the creation of special recovery points in advance.
WindowsRerror.ru
Resolution
Activate Driver Verifier with memory pool options enabled, to obtain more information about these errors and to locate the faulting driver.
Driver Verifier
Driver Verifier is a tool that runs in real time to examine the behavior of drivers. If it see errors in the execution of driver code, it proactively creates an exception to allow that part of the driver code to be further scrutinized. The driver verifier manager is built into Windows and is available on all Windows PCs. To start the driver verifier manager, type Verifier at a command prompt. You can configure which drivers you would like to verify. The code that verifies drivers adds overhead as it runs, so try and verify the smallest number of drivers as possible. For more information, see Driver Verifier.
Windows Memory Diagnostics
BAD POOL HEADER error in Windows 10
If you are unable to start Windows 10 in Normal mode, try booting in Safe Mode. That will help as you work through a resolution. You can try the procedures listed below to resolve this issue. Go through the entire list of suggestions first and then decide which one or more of these you would like to try out.
1] Uninstall recently installed software
If you recently installed any software, uninstall it and see if that makes the error go away. Most of the time, third-party antivirus applications are responsible for the error. In case you have installed antivirus software products on your system, you can try uninstalling them temporarily. If this resolves the problem, you can replace them with other applications. In the Control Panel window, click on “Programs and Features” to open the list of programs installed on the system and uninstall the antivirus program – or the recently installed software.
2] Uninstall recently installed hardware
If you recently installed any hardware, open Devices Manager, find the hardware driver, right-click on it and select Uninstall. Restart your computer and see.
3] Disconnect external devices
Another cause of the error might be external devices which are interfering with the system. To isolate this cause, disconnect all peripherals and external devices except for the keyboard and mouse and restart your machine. Check if it resolves the issue. If it works, one or more of the previously connected external hardware devices might be faulty and need to be replaced. If this does not resolve the issue, you can try the next steps.
4] Disable Fast Startup feature
Disable Fast Startup feature and see. It is enabled by default in Windows. At times, it can interfere with the system and cause pool header corruption.
5] Update Device Drivers
Faulty drivers may cause issues. Though Windows Update updates all drivers, they can be manually updated as well if the former step doesn’t work.
To update device drivers, press Win + R and open the Run window. Type devmgmt.msc to open the device manager. In the list of drivers, right-click on individual drivers and select “Update Driver Software” for each driver. Update all of them one by one.
You could also use Driver Verifier Manager to examine the behavior of bad drivers.
6] Perform a Clean Boot
Perform a Clean Boot and check if it resolves the problem. If you face no issues, it means that some non-Microsoft process is causing this stop error. You will have to manually try and identify the offender.
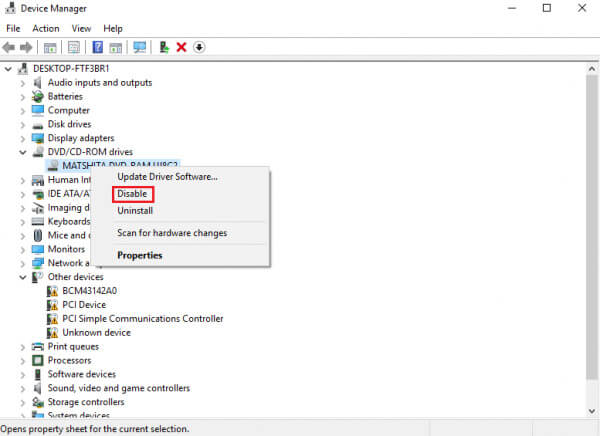
7] Perform Hardware Clean Boot
A Hardware Clean Boot is different from the usual Clean Boot State. The hardware components that are not necessary for a system to run are disabled in the Device Manager.
Press Win+R to open the Run window. Type devmgmt.msc and press Enter to open the Device Manager. You may disable the drivers for the following devices by right-clicking them and selecting the option to disable them.
- Display Adapters.
- DVD/CD-ROM drives.
- Sound, video and game controllers.
- Network Adapters.
- Modems
- Ports
- USB Devices and controller – provided you are NOT using USB/Wireless Mouse or Keyboard.
Restart the system and verify if this fixes the error. If it does, then it means that one of these devices is the cause. Again you will have to try and identify the device manually by trial and error method.
8] Run Windows Memory Diagnostics Tool
You could also run the built-in Windows Memory Diagnostics Tool. Open the tool and click Diagnose your computer’s memory problems.? Once the run is completed, you may open the Event Viewer and look for the results in the MemoryDiagnostics-Results entry.
9] Check your RAM
This is usually done by a hardware expert, but it has been reported that the issue could be with the RAM. Therefore, it should be verified.
Hope something helps!
If you are an advanced user, you may visit Microsoft for more on this stop error.
See this post if you receive a BAD_POOL_CALLER error.
Solution 2: Disabling Fast Startup
Fast Startup is useful when you prefer a shorter restart time for your computer. However, it can cause problems with the shutdown and startup processes. That said, this feature is one of the reasons why the 0x00000019: Bad Pool Header error message appears. To resolve the issue, you can try disabling the feature by following these steps:
- Open the Run dialog box by pressing Windows Key+R on your keyboard.
- Type “powercfg.cpl” (no quotes), then hit Enter.
- Go to the left-pane menu, then click the ‘Choose what the power buttons do’ option.
- Select the ‘Change settings that are currently unavailable’ link.
- Remember to deselect the box beside ‘Turn on fast startup (Recommended)’.
- Click Save Changes, then exit the window.
- Restart your PC, then check if the error is gone.