How to create temporary and permanent redirects with nginx
Содержание:
- Configure DNS Records
- 9:08 A Bit of History
- 24:46 Options for Trusted CAs
- Some useful recipes for an Nginx redirect
- Основные способы настройки редиректов
- Основные ошибки nginx и их устранение
- Example 2 — Creating a Persistent Experience Despite Single Page Name Changes
- 1:00 What is HTTPS?
- Solution at a Glance
- Шаг 4. Настройка NGINX
- Зачем серверу перенаправление?
- 2:02 SSL Handshake (Diffie‑Hellman)
- Немного о 301 и 302
- Все стандартные редиректы в nginx
- Когда нет доступа к исправлению .htaccess или конфигов NGINX
- Перенаправление Nginx
- Перенаправление запросов для отсутствующих доменов (перенаправление по умолчанию)
- 12:19 Cipher Suites Breakdown
- Temporary and Permanent Nginx Redirect Explained
- Examples – Standardizing the Domain Name
- Конфиг виртуального хоста NGiNX для работы по защищённому протоколу HTTPs с SSL-сертификатом Let’s Encrypt
- Перенаправление запросов для отсутствующих доменов (перенаправление по умолчанию)
- Заключение
- Онлайн курс «DevOps практики и инструменты»
Configure DNS Records
In order to set up the desired redirect, to or vice versa, you must have an A record for each name.
Open whatever you use to manage your DNS. For our example, we’ll use the DigitalOcean DNS.
If a domain (also known as a zone) record does not already exist, create one now. The hostname should be your domain, e.g. , and the IP address should be set to the public IP address of your Nginx server. This will automatically create an A record that points your domain to the IP address that you specified. If you are using another system to manage your domain, you may need to add this manually.
Next, add another A record with “www” as the hostname (or “www.example.com” if the partial subdomain doesn’t work), and specify the same IP address.
When you have created both records, it should look something like this:

Note: This will also work with CNAME records, as long as the canonical name’s A record refers to the IP address of your Nginx web server.
Now your server should be accessible via the www and non-www domain, but we still need to set up the redirect. We’ll do that now.
9:08 A Bit of History
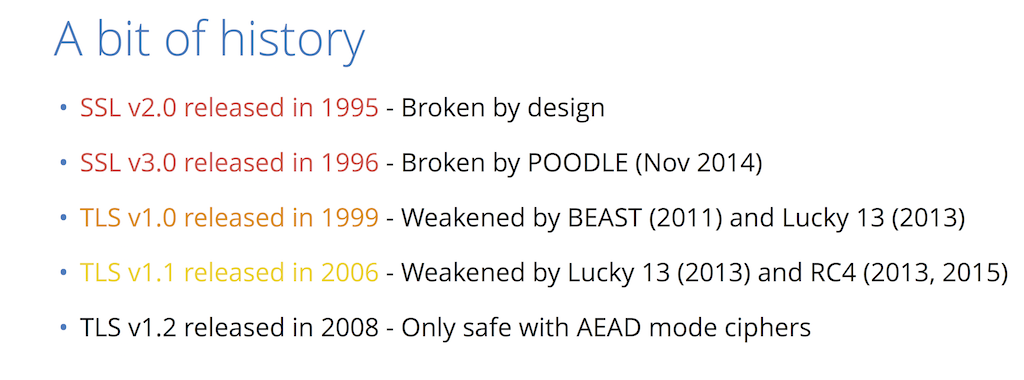
So, SSL v2.0 is really not recommended: it was broken a long time ago, it’s not cryptographically safe. SSL v3.0 – people have been using it all the way up until just under a year ago, when a cryptographic attack that was essentially ten years old got rediscovered and was found to break all of SSL v3.0.
TLS v1.0 and v1.1 are generally safe. And the latest one, v1.2, is the only one that doesn’t have any known attacks against it. TLS has a muddled history and doesn’t really have the best security record, but it’s the best that we have when it comes to interoperability with browsers and with services and it’s built into almost everything. So, TLS v1.2 is the way to go.
24:46 Options for Trusted CAs
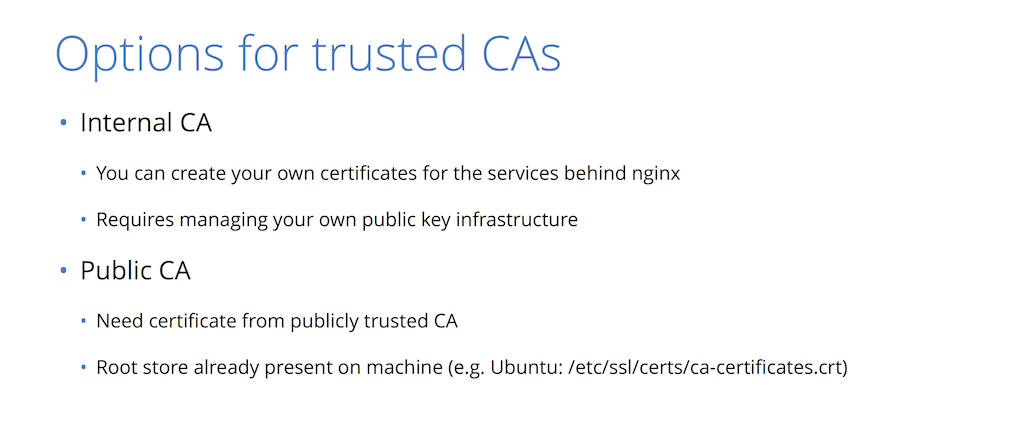
There are two different philosophies that you can use to approach this, and one is to create your own internal certificate authority and manage it in‑house. This is a little bit trickier, but it is cheaper and easier to manage because you can issue a certificate for any one of your services and have them issued to a certificate authority that you own and have full control over. In that case, this would be set to your certificate authority.
Alternatively, you can do the same technique that I described for NGINX. You can buy certificates for all of your services and then if your NGINX needs to trust them, it can trust the same set of certificate authorities that the browsers trust.
For Ubuntu, there’s a list on disk that holds all these certificates for basically every platform. But if you are building a large set of services that are going to need to talk to each other, it is hard to get certificates issued for these domains. You have to prove ownership to the certificate authority to actually get the certificate.
I recommend the internal CA mechanism. The tough part about this is – how do you keep the certificate authority safe? How do you keep the private key of that certificate authority safe? You can do it by having an offline computer and a special administrator, but in either case there are some challenges.
Some useful recipes for an Nginx redirect
return 301 https://$host$request_uri;
Read more about HTTP to HTTPS redirects in Nginx here.
Canonical hostname
If the hostname doesn’t match the first name in the server_name list. Makes sure your content is only available at the canonical hostname, e.g. to avoid duplicate content issues. Excellent for redirecting non-www to www or redirecting www to non-www in Nginx as long as your server block is only for a single website.
server_name example.com www.example.com example.net www.example.net _;
if ( $host != $server_name ) {
    return 301 $scheme://$server_name$request_uri;
}
Nginx is very efficient, but please note that it would be more efficient to have two separate server blocks – one for the hostnames you want to redirect and one for the website. Then Nginx won’t have to do the comparison for every request.
Generic non-www/www redirects
If your server block covers multiple websites – e.g. a WordPress multisite network and you don’t want all of them to redirect to the same hostname, you can still do a universal check:
Основные способы настройки редиректов
Например в 1C-Битрикс существует множество модулей, таких как .
Для других CMS также можно установить модули. Вот некоторые ссылки на модули для распространенных CMS: , , .
Настройка через указание отдельного условия в PHP-скрипте. Таким образом, обращаясь к корневому файлу php браузер получает команду открыть новую страницу вместо старой.
Например:
header(‘HTTP/1.1 301 Moved Permanently’);
header(‘Location: http://www.example.com/’);
Если необходимо перенаправить одну единственную страницу на сайте, одним из решений может быть настройка при помощи HTML путем добавления специального тега в заголовок HTML-документа (Meta Refresh).
Например,
JavaScript – операция осуществляется непосредственно через браузер и является наиболее медленным способом. Используется, если необходим редирект с задержкой. Минусом является то, что такой редирект не будет работать, если JavaScript отключен в браузере. И не будет учтен Яндексом.
Например, window.location.href=»https://site.com»
Настройка 301 редиректа на nginx. Настройки необходимо вносить в файлах конфигураций виртуальных доменов.
Например, rewrite ^https://$host$request_uri? ;
где:
$host – имя хоста из запроса, если отсутствует – имя в поле «Host» заголовка, если тоже отсутствует – имя сервера;
$request_uri – первоначальный запрос с аргументами (все, что идет после доменного имени).
могут иметь следующие параметры:
permanent – перенаправление с кодом 301,
redirect – перенаправить с кодом 302,
last – закончить обработку с переходом в новый location,
break – закончить обработку и остаться в текущем location.
Для настройки переадресаций на сервере Apache более надежной является настройка серверных редиректов через внесение изменений в файл .htaccess. Разберем этот способ подробнее.
Основные ошибки nginx и их устранение
502 Bad Gateway
Ошибка означает, что NGINX не может получить ответ от одного из сервисов на сервере. Довольно часто эта ошибка появляется, когда NGINX работает в связке с Apache, Varnish, Memcached или иным сервисом, а также обрабатывает запросы PHP-FPM.
Как правило, проблема возникает из-за отключенного сервиса (в этом случае нужно проверить состояние напарника и при необходимости перезапустить его) либо, если они находятся на разных серверах, проверить пинг между ними, так как, возможно, отсутствует связь между ними.
Также, для PHP-FPM нужно проверить права доступа к сокету.
Для этого убедитесь, что в прописаны правильные права
listen = /tmp/php5-fpm.sock
listen.group = www-data
listen.owner = www-data
504 Gateway Time-out
Ошибка означает, что nginx долгое время не может получить ответ от какого-то сервиса. Такое происходит, если Apache, с которым NGINX работает в связке, отдаёт ответ слишком медленно.
Проблему можно устранить с помощью увеличения времени таймаута.
При работе в связке NGINX+Apache в конфигурационный файл можно внести изменения:
server {
...
   send_timeout 800;
   proxy_send_timeout 800;
   proxy_connect_timeout 800;
   proxy_read_timeout 800;
...
}
Тут мы выставили ожидание таймаута в 800 секунд.
Upstream timed out (110: Connection timed out) while reading response header from upstream
Причиной может быть сложная и потому долгая обработка php в работе PHP-FPM.
Здесь тоже можно увеличить время ожидания таймаута
location ~ \.php$ {
   include fastcgi_params;
   fastcgi_index index.php;
   fastcgi_param SCRIPT_FILENAME $document_root$fastcgi_script_name;
   fastcgi_pass unix:/tmp/php5-fpm.sock;
   fastcgi_read_timeout 800;
}
800 секунд на ожидание ответа от бекенда.
413 Request Entity Too Large
Ошибка означает, что вы пытались загрузить слишком большой файл. В настройках nginx по умолчанию стоит ограничение в 1Mb.
Для устранения ошибки в nginx.conf нужно найти строку
client_max_body_size 1m;
и заменить значение на нужное. Например, мы увеличим размер загружаемых файлов до
client_max_body_size 100m;
Также, можно отключить проверку размера тела ответа полностью значением ноль:
client_max_body_size 0;
304 Not Modified не устанавливается
Если возникает проблема с правильным отображением ответного заголовка сервера , то проблема, скорее всего, в пунктах:
- В секции конкретного сайта включен (). По умолчанию, ssi отключен, но некоторые хостеры и ISPManager любят его прописывать в дефолтную конфигурацию сайта включенным. Его нужно обязательно отключить, закомментировав или удалив эту строку;
- установить в , то есть на уровне или конкретного прописать:
Example 2 — Creating a Persistent Experience Despite Single Page Name Changes
Sometimes, it is necessary to change the names of individual pages that have already been published and received traffic on your site. Changing the name alone would cause a 404 Not Found error for visitors trying to access the original URL, but you can avoid this by using a redirect. This makes sure that people who have bookmarked your old pages, or found them through outdated links on search engines, will still reach the correct page.
Let’s imagine your website had two separate pages for products and services called and respectively. Now, you’ve decided to replace those two pages with a single offer page called instead. We will configure a simple redirect for and to .
We assume you have your website configured as follows:
Assumed original server block configuration
Configuring the redirects is as simple as using two directives.
Redirects added to the original configuration
The directive accepts the original address that has to be redirected as well as the destination address of a new page. Since the change here is not a temporary one, we used in the directive as well. You can use as many redirects like that as you wish to make sure your visitors won’t see unnecessary Not Found errors when moving site contents.
1:00 What is HTTPS?

So, as you might guess, HTTPS is HTTP plus S, and S stands for security. In the case of the web, there are two protocols, called SSL and TLS. They’re kind of used interchangeably; I’ll go into that a little bit later. But, is the security layer that sits on top of your communication. If you think of the OSI stratum, it sits below Layer 7 in something called Layer 6, the presentation layer.
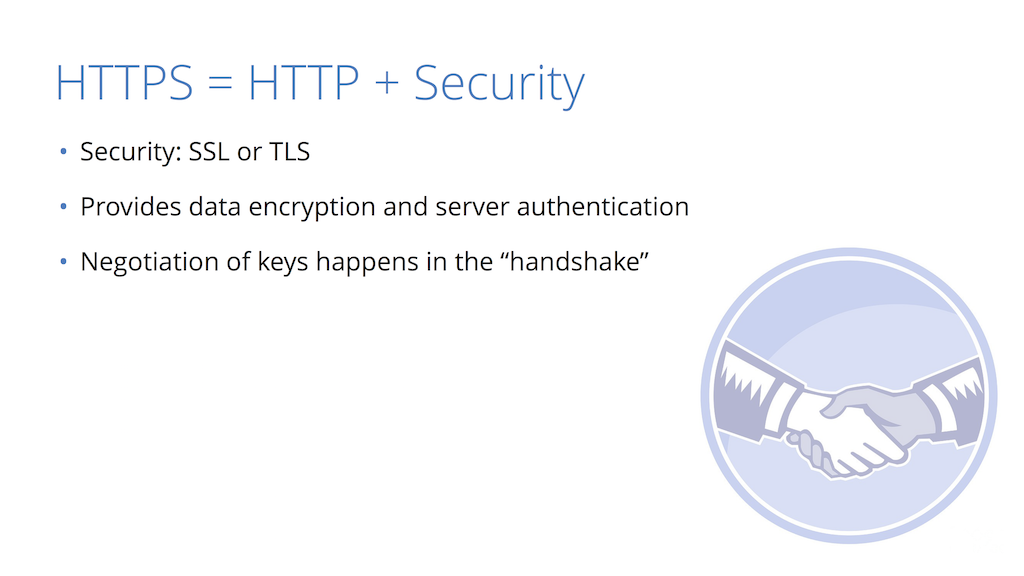
What it provides to you, between a client and the server, is confidentiality of data. So, everything that’s sent from the client to the server and back is fully encrypted so that the only two people that know how to read it are the client and the server. It also provides a form of authentication where the client can know that the server is exactly who it says it is. These are all intertwined in the concept of the handshake.
Solution at a Glance
In Nginx, you can accomplish most redirects with the built-in directive. This directive is available by default on a fresh Nginx installation and can be used to create both temporary and permanent redirects. In its simplest form, it takes at least two arguments: the old URL and the new URL.
You can implement a temporary redirect with the following lines in your server configuration:
Temporary redirect with rewrite
This redirect instructs the browser to direct all requests for to . This solution, however, works only for a single page, not for the entire site. To redirect more than a single page, you can use the directive with regular expressions to specify entire directories instead of just single files.
matches regular expression patterns in parenthesis. It then references the matched text in the redirect destination using expression, where is the first group of matched text. In more complex examples, subsequent matched groups are given numbers sequentially.
For example, if you wanted to temporarily redirect every page within to , you could use the following:
Temporary redirect with rewrite
By default, the directive establishes a temporary redirect. If you would like to create a permanent redirect, you can do so by replacing with at the end of the directive, like this:
Permanent redirects
Let’s move on to some specific examples.
Шаг 4. Настройка NGINX
Открываем/создаем файл конфигурации для виртуального домена:
vi /etc/nginx/conf.d/test.dmosk.local.conf
* где test.dmosk.local.conf может называться как угодно, главное — чтобы на конце было .conf.
Приводим его к следующему виду:
server {
listen 80;
server_name test-http2.dmosk.local;
return 301 https://$host$request_uri;
}
server {
listen 443 ssl http2;
ssl on;
ssl_certificate /etc/nginx/ssl/cert.pem;
ssl_certificate_key /etc/nginx/ssl/cert.key;
location / {
root /usr/share/nginx/html;
}
}
* в первых 4 строкам мы указываем перенаправлять все http-запросы на https; /etc/nginx/ssl/ — путь, где лежат наши файлы сертификатов; /usr/share/nginx/html — корневая директория, где лежат файлы сайта.
Проверяем корректность настройки nginx:
nginx -t
И перезапускаем его:
systemctl restart nginx
* на более ранних системах service nginx restart.
Зачем серверу перенаправление?
Редирект используется всякий раз, когда сайту необходимо, чтобы пользователи, создающие запросы, были направлены на другой адрес. Существует множество ситуаций, в которых редирект крайне необходим.
Перемещение на другой домен
К примеру, вы запустили сайт, а теперь хотели бы изменить свой домен; в такой ситуации не следует просто отказываться от старого домена, лучше прибегнуть к использованию перенаправления.
В противном случае все закладки и ссылки на ваш сайт, расположенные на других страницах сети Интернет, перестанут работать, поскольку контент исчез без каких-либо указаний, как браузеру искать его новое местонахождение.
Изменение домена без перенаправления не только приведёт к потере трафика от предыдущих посетителей, но и может серьёзно повлиять на доверие к сайту.
Расширение на похожие домены
Часто владельцы сайтов регистрируют несколько вариаций доменного имени, чтобы выиграть на запросах адресов, похожих на основной домен.
К примеру, если у вас есть домен supersite.com, вы могли бы также приобрести домены вроде supersite.net и supersite.org, а затем просто перенаправить оба похожих домена на основной.
Это позволяет получить пользователей, которые пытаются попасть на ваш сайт по неправильному адресу. Также это исключает вероятность того, что другой сайт будет использовать похожий домен и таким образом отнимет у вас трафик.
Изменение имени страницы
Иногда возникает необходимость изменять имена ранее опубликованных страниц сайта, на которые уже идёт трафик. Как правило, это приводит к 404 Not Found (или другой ошибке, в зависимости от настроек безопасности сервера). Но этого можно избежать, перенаправив пользователей на другую страницу, которая содержит искомый контент.
Форсирование SSL-соединений
Простой и достаточно распространённый способ перенаправления – это направление всего трафика на использование SSL вместо стандартного HTTP.
Таким образом можно перенаправить все запросы с http://www.mysite.com на адрес https://www.mysite.com и тем самым повысить безопасность соединений.
2:02 SSL Handshake (Diffie‑Hellman)
This is your SSL/TLS handshake. It’s a little complicated; there’s a lot of moving parts but essentially, if you take a step back it’s an extra one or two round trips between the client and the server that send cryptographic information. In this case, you have several options right here – there’s server randoms, there’s client randoms; this is all kind of deep stuff you don’t really need to know.
All you need to know is that the server itself sends a public key, and the client and server establish a shared secret that they can use to encrypt the communication. So, all the communication between the visitor and the server is encrypted with a symmetric key, meaning both parties have the same key. There’s also an integrity key, so in this case an HMAC, but I’ll skip over this diagram for now and go to the more salient question of “why set up HTTPS?”.
Немного о 301 и 302
В чем принципиальная разница между ответом с кодом 301 и 302? Для обычного посетителя сайта разницы нет. А вот для поискового робота разница огромная.
301-й редирект говорит о склеивании страниц. Это означает для поисковика то, что старая и новая страницы — это одно и то же. Таким образом, результаты ранжирования необходимо сохранить для новой страницы.
302-о перенаправление просто говорит о том, что нужно перейти по другому адресу. Поисковый робот не сохраняет результат выдачи для новой страницы, индексируя его с нуля.
Все стандартные редиректы в nginx
Рассмотрю типовой пример, когда у нас одновременно присутствуют следующие редиректы:
- С http на https.
- С www на без www для обоих протоколов.
- Без слеша на конце на урл со слешем.
Наша цель будет реализовать все преобразования url в одном месте и выдать клиенту только один 301-й редирект.
server {
    listen 443 ssl http2;
    server_name site.ru;
    root /web/sites/site.ru/www/;
    index index.php index.html index.htm;
    access_log /web/sites/site.ru/log/access.log main;
    error_log /web/sites/site.ru/log/error.log;

    ssl_certificate		/etc/letsencrypt/live/site.ru/fullchain.pem;
    ssl_certificate_key		/etc/letsencrypt/live/site.ru/privkey.pem;

    location / {
	rewrite ^(*)$ $1/ permanent;
	try_files $uri/ /index.php?$args;
	}

    location ~* ^.+.(js|css|png|jpg|jpeg|gif|webp|ico|woff|txt)$ {
	access_log off;
	expires max;
	}

    location ~* ^/(\.ht|xmlrpc\.php)$ {
	return 404;
	}

    location ~ \.php$ {
	try_files  $uri =404;
	fastcgi_pass   unix:/var/run/php-fpm/php7-fpm.sock;
	fastcgi_index index.php;
	fastcgi_param DOCUMENT_ROOT /web/sites/site.ru/www/;
	fastcgi_param SCRIPT_FILENAME /web/sites/site.ru/www$fastcgi_script_name;
	fastcgi_param PATH_TRANSLATED /web/sites/site.ru/www$fastcgi_script_name;
	include fastcgi_params;
	fastcgi_param QUERY_STRING $query_string;
	fastcgi_param REQUEST_METHOD $request_method;
	fastcgi_param CONTENT_TYPE $content_type;
	fastcgi_param CONTENT_LENGTH $content_length;
	fastcgi_param HTTPS on;
	fastcgi_intercept_errors on;
	}

    location = /favicon.ico {
	log_not_found off;
	access_log off;
	}

    location = /robots.txt {
	allow all;
	log_not_found off;
	access_log off;
	}
}

server {
    listen 443 ssl http2;
    server_name www.site.ru;

    location ~* ^.+.(js|css|png|jpg|jpeg|gif|webp|ico|woff|txt)$ {
	return 301 https://site.ru$request_uri;
    }

    location / {
	rewrite ^/(.*)/$ /$1;
	return 301 https://site.ru$uri/;
    }
}

server {
    listen 80;
    server_name site.ru www.site.ru;

    location ~* ^.+.(js|css|png|jpg|jpeg|gif|webp|ico|woff|txt)$ {
	return 301 https://site.ru$request_uri;
    }

    location / {
	rewrite ^/(.*)/$ /$1;
	return 301 https://site.ru$uri/;
    }
}
Получилось примерно так. Призываю не копировать бездумно конфиг, а проверить то, что я предлагаю. Хотя я сам внимательно проверил, как мог, но все равно не застрахован от ошибки. На мой взгляд здесь рассмотрены все основные моменты с редиректами. На выходе всегда один 301 редирект, какой бы запрос мы не сделали. При этом все реализовано средствами самого веб сервера, а значит, будет работать максимально быстро.
Когда нет доступа к исправлению .htaccess или конфигов NGINX
Бывает и такое. Вот пример из интернета для редиректа с http на https для WordPress. Этот код надо вставить в файл functions.php (редактирование темы):
PHP
## redirect с http на https
add_action( ‘init’, ‘http_to_https_redirect’ );
function http_to_https_redirect() {
if ( is_ssl() ) {
return;
}
if ( 0 === strpos( $_SERVER, ‘http’ ) ) {
wp_redirect( set_url_scheme( $_SERVER, ‘https’ ), 301 );
} else {
wp_redirect( ‘https://’ . $_SERVER . $_SERVER, 301 );
}
exit;
}
|
1 |
## redirect с http на https add_action(‘init’,’http_to_https_redirect’); functionhttp_to_https_redirect(){ if(is_ssl()){ return; } if(===strpos($_SERVER’REQUEST_URI’,’http’)){ wp_redirect(set_url_scheme($_SERVER’REQUEST_URI’,’https’),301); }else{ wp_redirect(‘https://’.$_SERVER’HTTP_HOST’.$_SERVER’REQUEST_URI’,301); } exit; } |
Может вариант не сработать, если сервер на NGINX. От настроек хостера зависит.
Но смысл в том, что при проявлении фантазии, можно и на php сделать редирект.
Перенаправление Nginx
Перенаправление на сервере Nginx гораздо проще. В большинстве случаев для перенаправления контента можно создать блок server.
Например, чтобы перенаправить запросы с domain1.com на domain2.com, можно создать следующий блок:
Директива return выполняет подстановку URL-адреса, а затем возвращает заданный код статуса и указанный URL.
В данном случае директива обращается к переменной “$scheme” для использования любой схемы, заданной в исходном запросе (HTTP или HTTPS). Затем она возвращает код постоянного редиректа 301 и новый URL-адрес.
Для обработки перенаправления каталога на отдельный поддомен можно использовать директиву rewrite, аналогичную перенаправлению каталогов на сервере Apache:
Данная директива, расположенная в блоке server, создаст временный редирект запросов к каталогу images на поддомен images.example.com.
Для постоянного редиректа замените redirect в конце строки на permanent.
Перенаправление запросов для отсутствующих доменов (перенаправление по умолчанию)
Если обращение к веб-серверу идет по IP-адресу или домену, который не прописан в конфигурационном файле, можно перенаправить весь трафик на домен по умолчанию:
server {
listen 80 default_server;
return 302 https://welcome.domain.ru$request_uri;
}
или независимо от протокола:
server {
listen 80 default_server;
return 302 $scheme://welcome.domain.ru$request_uri;
}
server {
listen 443 default_server;
return 302 $scheme://welcome.domain.ru$request_uri;
ssl on;
ssl_certificate /etc/nginx/ssl/cert.pem;
ssl_certificate_key /etc/nginx/ssl/cert.key;
}
* $scheme позволяет перевести запрос на тот же протокол (http или https), по которому он был инициирован.
* если nginx должен слушать и обрабатывать запросы по https, необходимо указывать в настройках пути к сертификатам.
12:19 Cipher Suites Breakdown
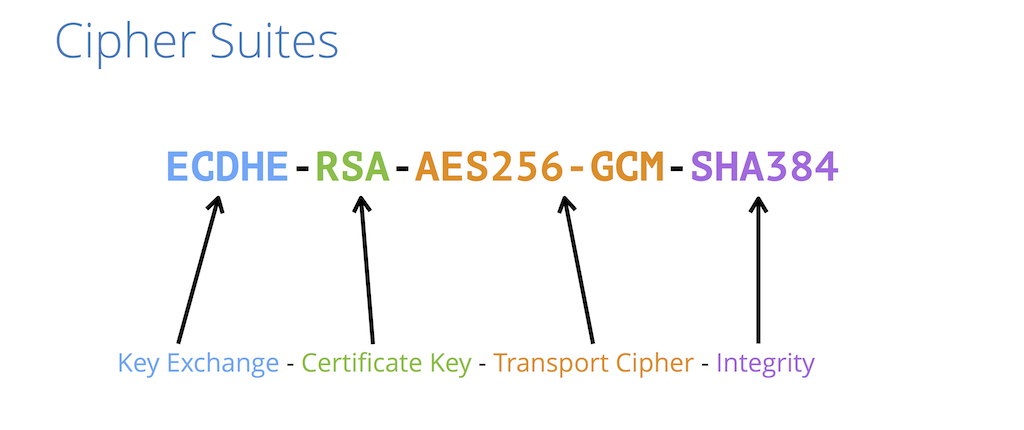
Essentially, the first term is the key exchange, an algorithm that the two parties use to exchange keys. In this case, it’s based on the Diffie‑Hellman algorithm.
The second term is what type of key is in your certificate. So every certificate has a public key of a certain type. In this case it’s RSA.
The third piece is your transport cipher, the encryption algorithm used to encrypt all the data. There’s a lot of different pieces that go into this, but AES‑GCM is the most secure cipher; this is actually something that Intel processors do at almost zero cost. So this is a pretty cheap and solid cipher to use.
The last one is integrity. As I mentioned, messages have a cache that goes along with them to make sure they haven’t been tampered but if it’s encrypted, and with integrity, you can go from there.
Temporary and Permanent Nginx Redirect Explained
Temporary redirects is beneficial if a page location needs to change from one place to another location temporarily. The redirects response code 302 is used for designating the temporary movement of a page.
If website maintenance is being performed, temporary redirects are used to notify the users that the website is unavailable. Another example is when you make temporary redirects of an incomplete page; you link that page to another point or the main page:
Visitor–> Website Page–> Website is under maintenance
On the other hand, a permanent Nginx redirect informs the web browser that it should permanently link the old page or domain to a new location or domain. To map this change, the redirects response code 301 is used for designating the permanent movement of a page. These kinds of redirects are helpful when the user wants to change the domain name and no longer wants a browser to access it.
For example, when you wish to change the domain of your website or create a new page for an older one:
Visitor–> Click www.devisers.in/home -> Redirected to www. devisers. in/home1
Page Redirects in Nginx
Remember, first you have to access your VPS through SSH. If you’re having trouble, check out our PuTTY tutorial.
In Nginx, most redirects can be achieved with the help of inbuilt rewrite feature. This is the default feature that’s available on a clean installation of Nginx and can form both kinds of Nginx redirect – i.e. permanent and temporary. In its plain form, it takes a minimum of two cases i.e. old URL and new URL.
It is simple and easy to redirect pages to a temporary or permanent location on Nginx web server. In the location /etc/nginx/sites-enabled/default you should paste in the following code, while changing the variables to suit your needs:
Location path_pattern {
     rewrite ^/oldURL$ https://www.domainone.com/newURL redirect;
}
If you want to redirect the page to another link permanently, simple use “permanent” instead of “redirect” in the above command. Meanwhile, the path_patern is typically /index.html.
Nginx Redirecting a Domain
For redirecting one domain to another use the below command in the terminal:
server {
      listen 80;
      hostname devisers.in www.devisers.in;
      rewrite ^ http://www.devisers.com$request_uri? permanent;
}
Here, we use two domains. The one we want to redirect – www.devisers.in, and the new one – www.devisers.com.
Nginx Redirect from HTTP to HTTPS (SSL)
HTTP and HTTPS use different ports – HTTP port 80 and HTTPS port 443. Using HTTPS is much more helpful since it protects you from MITM attacks that can hijack your session. Remember, that for this method to work, you need to have an SSL already set up. So, to protect all the information sent between you and your visitors, it is beneficial to redirect all the requests coming from HTTP to HTTPS. For that, we can add this modification to the same file:
server {
listen 80 default_server;
server_name _;
return 301 https://$host$request_uri;
}
Now all traffic for HTTP default server redirects to HTTPS.
Nginx Redirect Specific Sites
This is essential if you are using various sites or apps and want to redirect only a single site. Follow the steps below:
server {
listen 80;
server_name devisers.in;
     return 301 https://devisers.in$request_uri;
}
Here, we are redirecting the site http://www.devisers.in to https://www.devisers.in
Redirect From www to non-www
There are many times when you want your visitors to access the plain domain of your web page such as devisers.in instead of www.devisers.in. Although there are many options to redirect from www to non-www in Nginx, one of the easy way to do so is as described below:
server {
    server_name www.devisers.in;
    return 301 $scheme://devisers.in$request_uri;
}
Important: This is permanent Redirect or “301 Redirect”.
Restart the Nginx web server to put the changes into effect using the command:
sudo systemctl restart Nginx
If you wish to redirect from non-www to www, simply replace the website URL’s mentioned in the above command. Replace www.devisers.in with devisers.in and vice versa.
Examples – Standardizing the Domain Name
One of the most common uses of NGINX rewrite rules is to capture deprecated or nonstandard versions of a website’s domain name and redirect them to the current name. There are several related use cases.
Redirecting from a Former Name to the Current Name
This sample NGINX rewrite rule permanently redirects requests from www.old‑name.com and old‑name.com to www.new‑name.com, using two NGINX variables to capture values from the original request URL – is the original protocol (http or https) and is the full URI (following the domain name), including arguments:
Because captures the portion of the URL that follows the domain name, this rewrite is suitable if there’s a one‑to‑one correspondence of pages between the old and new sites (for example, www.new‑name.com/about has the same basic content as www.old‑name.com/about). If you’ve reorganized the site in addition to changing the domain name, it might be safer to redirect all requests to the home page instead, by omitting :
Some other blogs about rewriting URLs in NGINX use the directive for these use cases, like this:
This is less efficient than the equivalent directive, because it requires NGINX to process a regular expression, albeit a simple one (the caret , which matches the complete original URL). The corresponding directive is also easier for a human reader to interpret: more clearly indicates that NGINX returns code than the notation does.
Adding and Removing the www Prefix
These examples add and remove the www prefix:
Again, is preferable to the equivalent , which follows. The requires interpreting a regular expression – – and creating a custom variable () that in fact is equivalent to the built‑in variable.
Redirecting All Traffic to the Correct Domain Name
Here’s a special case that redirects incoming traffic to the website’s home page when the request URL doesn’t match any and blocks, perhaps because the domain name is misspelled. It works by combining the parameter to the directive and the underscore as the parameter to the directive.
We use the underscore as the parameter to to avoid inadvertently matching a real domain name – it’s safe to assume that no site will ever have the underscore as its domain name. Requests that don’t match any other blocks in the configuration end up here, though, and the parameter to tells NGINX to use this block for them. By omitting the variable from the rewritten URL, we redirect all requests to the home page, a good idea because requests with the wrong domain name are particularly likely to use URIs that don’t exist on the website.
Конфиг виртуального хоста NGiNX для работы по защищённому протоколу HTTPs с SSL-сертификатом Let’s Encrypt
Итак, у нас есть конфиг виртуального хоста NGiNX для настройки работы домена в связке Apache + NGiNX. Всё работает как надо, но нам этого мало, нам надо, чтобы весь трафик шифровался. И не славы ради, а SEO для. Всё для лучшего ранжирования и занятия призовых мест в выдаче поисковых машин, которые последнее время писают кипятком от сайтов, работающих по протоколу HTTPs. А нужно ли это вообще или нет, — никого не интересует. Мощности современных телефонов давно уже позволяют выводить космические корабли не только на околоземную орбиту, но и шифровать/дешифровать данные, которые им прилетают из окружающего эфира.
Сразу приведу рабочий конфиг виртуального хоста, отвечающего за замен . Для других доменов, работающих по описанным ранее схемах, нужно просто поменять доменное имя.
Перенаправление запросов для отсутствующих доменов (перенаправление по умолчанию)
Если обращение к веб-серверу идет по IP-адресу или домену, который не прописан в конфигурационном файле, можно перенаправить весь трафик на домен по умолчанию:
server {
listen 80 default_server;
return 302 https://welcome.domain.ru$request_uri;
}
или независимо от протокола:
server {
listen 80 default_server;
return 302 $scheme://welcome.domain.ru$request_uri;
}
server {
listen 443 default_server;
return 302 $scheme://welcome.domain.ru$request_uri;
ssl on;
ssl_certificate /etc/nginx/ssl/cert.pem;
ssl_certificate_key /etc/nginx/ssl/cert.key;
}
* $scheme позволяет перевести запрос на тот же протокол (http или https), по которому он был инициирован.
* если nginx должен слушать и обрабатывать запросы по https, необходимо указывать в настройках пути к сертификатам.
Заключение
Я прилично заморочился с темой редиректов в nginx. Раньше никогда не обращал на них пристального внимания. Да и у других не видел акцента на этом. В интернете полно готовых вариантов перенаправлений на все случаи жизни, но рассмотрены они в отдельности. А вот так комплексно взглянуть на полный конфиг со всеми нюансами не приходилось.
В завершении рекомендую мою статью про настройку nginx. Я там частично рассматриваю и эту тему
А вообще там рассказаны все основные моменты, на которые стоит обращать внимание при работе с nginx
Онлайн курс «DevOps практики и инструменты»
Если у вас есть желание научиться строить и поддерживать высокодоступные и надежные системы, научиться непрерывной поставке ПО, мониторингу и логированию web приложений, рекомендую познакомиться с онлайн-курсом «DevOps практики и инструменты» в OTUS. Курс не для новичков, для поступления нужны базовые знания по сетям и установке Linux на виртуалку. Обучение длится 5 месяцев, после чего успешные выпускники курса смогут пройти собеседования у партнеров.
Проверьте себя на вступительном тесте и смотрите программу детальнее по .